Dual booting is when you have not one but two Operating Systems on your computer. If you choose to dual boot, you can freely switch between the two Operating Systems that you have on your computer by restarting it and being faced with a boot menu where you can pick which Operating System you want your computer to boot. It is entirely possible, and even beneficial, for you to dual boot Windows 10 with whatever version of Windows your computer is currently running on, and the following is the entire process you need to go through in order to do so:
Phase 1: Shrink your Windows 7 or 8 partition to make space for Windows 10
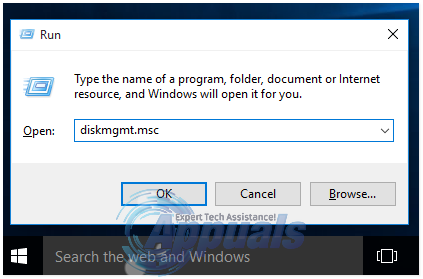
Before you can actually install Windows 10 on your computer alongside the installation of Windows 7 or 8 that your computer already has, you need to free up enough space for Windows 10. To do so, you will need to shrink any one of the partitions on your hard drive, creating a fair bit of unallocated disk space that Windows 10 will, in turn, be installed in. Press the Windows Logo key + R to open up a Run. Type diskmgmt.msc into the Run dialog and press Enter.
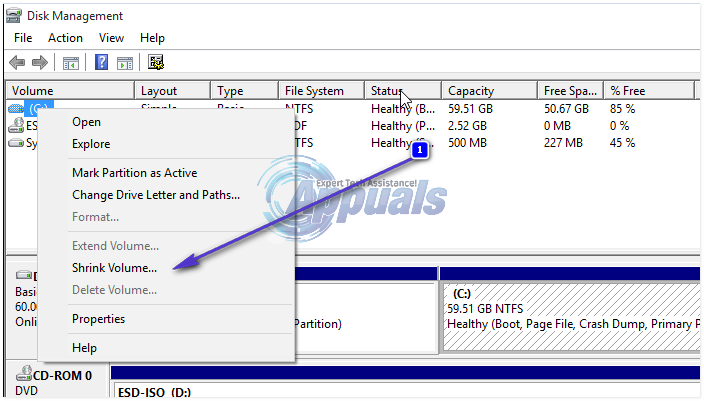
This will open a window named Disk Management that displays information pertaining to all of the partitions on your hard disk. In this window, locate the hard disk partition you want to shrink to create space for Windows 10, right-click on it and click on Shrink Volume.
Type in the amount of disk space you want to free up on your selected partition in the Enter the amount of space to shrink in MB You need a minimum of 16 Gigabytes of hard disk space for the 32-bit version of Windows 10 and a minimum of 20 Gigabytes for the 64-bit version. However, that is not all that you have to take into account when deciding how much disk space to free up – more factors include the disk space that the apps you download, the page file, drivers and the data that accumulates over time will take up. It is recommended that you free up at least 30-50 Gigabytes of disk space, even if you have the most basic of requirements. Once you have entered the amount of disk space you want to free up into the field, click on Shrink. Once you do so, the amount of disk space you freed up will show up in the Disk Management window as unallocated disk space.
What to do if you get the Dynamic Volume Error Message during Phase 1
Some Windows users may receive the following error when trying to shrink a partition of their hard drive to make space for Windows 10: The dynamic volume error message is almost always seen on computers that have a whole bunch of manufacturer-made partitions on their hard drives – partitions such as: In such cases, the user will not be able to shrink any partition of their hard drive regardless of whether they try to do so using the Disk Management window or a third-party hard disk partitioning program. In fact, using a third-party hard disk partitioning program on a computer affected by this problem may cause issues that completely restrain the computer from starting up. The only way to get rid of the dynamic volume error message and successfully shrink a partition of your hard drive to free up space for Windows 10 is to sacrifice one of the useless manufacturer-made partitions on your hard drive. Sacrificing any partition other than other than the ones named System, Recovery or Local Disk C – a partition such as Tools – will suffice. All you need to do is open the Disk Management window, right-click on the partition of your hard drive that you want to get rid of in order to be able to shrink a partition such as Local Disk C or D, and click on Delete Volume. Performing the steps described above will lead to the disk space occupied by the partition you erased to turn into unallocated disk space. The next step will be to right-click on the partition you plan on shrinking to create enough disk space for Windows 10, clicking on Extend Volume and clicking on Yes in the warning that appears subsequently. A wizard will open, and go through this wizard and the onscreen instructions to merge the partition you will later be shrinking with the unallocated disk space. Once the merger has been completed, you can go ahead and carry out Phase 1, and you should be successful at shrinking whatever hard drive partition to have decided on shrinking to free up enough disk space for Windows 10.
Phase 2: Download a Windows 10 ISO file and fire up the Windows 10 setup file
Once you have successfully shrunken a partition on your hard drive to create enough unallocated hard disk space for Windows 10 and all the data that you will store on it, you can move onto actually downloading a Windows 10 ISO file and running the Windows 10 setup wizard. Go here, scroll down and click on Download tool now to download the Windows 10 Media Creation Tool. Install and run the Windows 10 Media Creation Tool. Click on Create installation media for another PC. Select your preferred language and the version of Windows 10 you want to download in the form of an ISO file. When asked what media you want the tool to use, select ISO file and click on Next. Download the ISO file for Windows 10 and, once downloaded, extract it using an extraction utility such as WinRAR or 7-zip or MagicISO (I Use MagicISO). From the contents of the extracted ISO file, double-click on the ources folder to open it. Double-click on the exe file in the sources folder to run the Windows 10 setup wizard. There are quite a few different files that have the term setup in their names in the sources folder, so make sure that you double-click on the file that is exclusively named setup. Click on Yes if prompted by UAC.
Phase 3: Install Windows 10 alongside your previous installation of Windows
Once your computer starts running the Windows 10 setup wizard, the only phase of this process left is to actually install Windows 10 alongside your previous installation of Windows, and this can get a bit tricky as it differs significantly from what you would do to simply clean-install Windows 10 as your sole Operating System. If your computer does not have all the latest Windows updates installed, you will be asked if you want to get important updates for Windows Setup. Just to make sure nothing goes wrong, click on Go online to install updates now (recommended) and wait for the latest updates to be downloaded and installed. Click on Install now. Configure your region and language settings and other preferences if prompted to do so. Enter your product key or skip this step if you are only trying Windows 10 out or if you already own a legitimate and registered version of Windows 7 or 8. Also agree to the licensing terms and agreement. When asked what kind of installation you want, select Custom: Install Windows only (Advanced). This option lets you install Windows 10 alongside your previous Windows installation, whereas the Upgrade option will overwrite your previous installation with Windows 10. When asked where you want to install Windows, select the Unallocated space option that has the same amount of free space as the amount of disk space by which you shrank a partition of your hard disk during Phase 1. When you select the unallocated space option, a Size box will open at the bottom of the dialog. Just click on Apply, and the unallocated space will be turned into an actual partition. Select this partition and click on Next. The setup will now start installing Windows 10 on your computer. Let it do so and wait for it to finish. Once the setup is done working its magic, you will have both Windows 10 and your previous installation of Windows on your computer as its Operating Systems and you will have succeeded at setting your computer up for dual-booting. Since that is the case, whenever you boot your computer up, you will be provided with the option to choose between booting Windows 10 and booting your previous Windows installation (Windows 7 or 8). To switch between your two Operating Systems, you will have to reboot your computer and then select your desired version of Windows. If you click on the Change defaults or choose other options link in the boot menu, you will be taken to a menu where you can configure settings and preferences such as the default Operating System for your computer and the amount of time your computer stays at the boot menu before booting up the default version of Windows. Windows 7, 8, 8.1 and 10 all use the NTFS file system, which means that you can access data stored on both of your Operating Systems regardless of which one you are logged on to. The partitions of your hard drive containing both of your installations of Windows will appear in the Windows Explorer separately with their own dedicated drive letters, and you can right-click on any of these drives and click on Rename to give them more fitting and easily recognizable names.
Fix: Dual Boot Windows 10 and Windows 11 Not WorkingHow to Dual Boot Windows 11 with Windows 10?How to Transfer Files from Ubuntu to Windows 10 in Dual BootHow to Create a Dual Boot for Windows and Ubuntu


