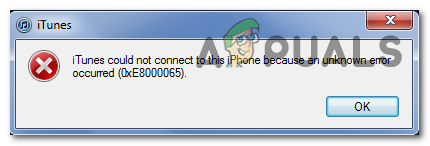
Since the problem can be caused by a generic glitch caused by long idle periods, start simply by restarting your computer and repeating the syncing procedure. If that doesn’t work, try updating your iTunes version to the latest and see if that manages to resolve the issue. Keep in mind that you might be also dealing with some type of corruption rooted in your iTunes folder. In this case, you’ll need to reinstall iTunes from scratch along with every other supporting application – The steps of doing so will be different if you’re using the UWP version of iTunes. However, it’s possible that the problem is actually being caused by a problem with the Universal Serial Bus controller. A driver inconsistency can also cause this issue. To fix this issue, try using a different port (preferably USB 3.0). If that doesn’t work, reinstall every USB controller in order to force Windows to reinstall them from scratch. Also, don’t neglect the possibility of a bad cable that’s corroded or non-congruent. In some rare circumstances, the issue can also be caused by a BIOS glitch that creates some issues with the USB controller. In this case, updating to the latest BIOS version should take care of the issue.
Method 1: Restarting your Computer
Before you get to any of the other fixes, start simple with a system reboot and repeat the syncing procedure once again once the next startup sequence is complete. As it turns out, this problem can occur due to a temporary glitch and restarting your computer will clear the data causing the issue. Preferably, you should remove the data cable from your PC USB port before initiating the restart. In case the restart didn’t resolve the issue, move down to the next method below.
Method 2: Updating iTunes to Latest version
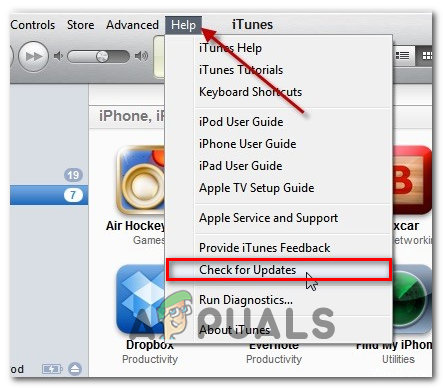
In case you’re encountering the issue on Windows 10, you’re probably dealing with a problem facilitated by a Windows update. If that’s the case, updating your iTunes version to the latest should fix the issue for you. Apple is notoriously known for resolving cross-platform incompatibilities in a matter of days. Several affected users have confirmed that updating their iTunes version has allowed them to fix the 0xE8000065 and sync their Apple mobile device normally. Keep in mind that iTunes should be automatically configured to auto-update itself. But in case you have previously disabled this function or a different 3rd party tool is stopping the program from updating, you might need to do it manually. To initiate an iTunes update, open the program and click on Help from the ribbon bar at the top. Next, click on Check for updates and wait for the scan to complete. In case a new version of iTunes is available, this process will automatically download it and install it. Just follow the on-screen prompts to do so. In case the investigation above reveals that you already had the latest version, move down to the next potential fix below.
Method 3: Reinstalling iTunes
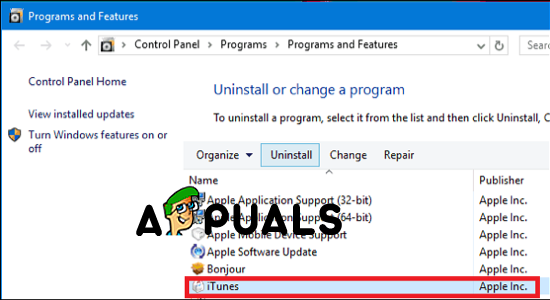
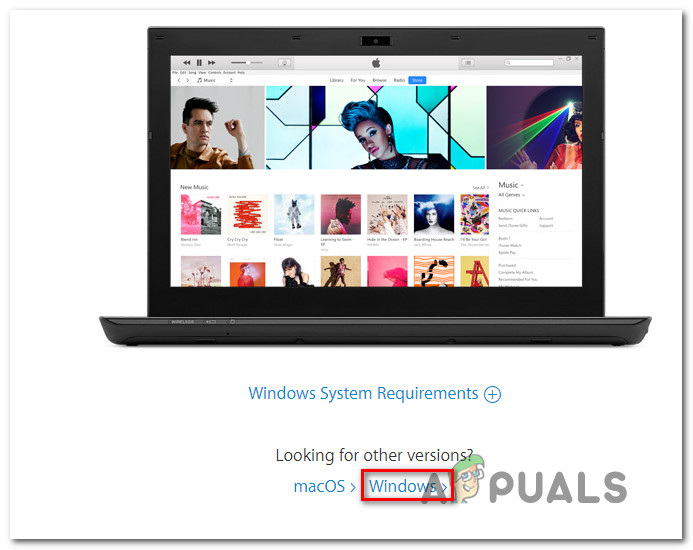
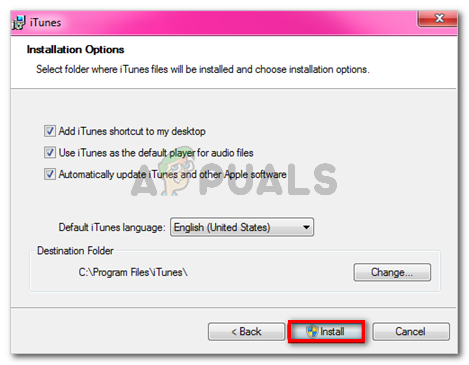
As it turns out, the ‘iTunes could not connect to this iPhone / iPad because of an unknown error occurred (0xE8000065).’ error can also be caused by some corruption originating from the iTunes folder. If this scenario is applicable, you should be able to get the issue resolved by reinstalling the iTunes app completely. Problems like this typically occur after an AV scan ends up quarantining some items belonging to iTunes or the Bonjour program. Several affected users have confirmed that they managed to fix the issue by uninstalling Itunes along with any associated components and then redownloading & installing the latest version. However, the steps of uninstalling iTunes will be different in case you are encountering the 0xE8000065 error with the UWP (Universal Windows Platform) version. To accommodate both scenarios, we created two guides that will show you how to reinstall every involved component.
Reinstalling the Desktop Version of iTunes
Reinstalling the UWP version of iTunes
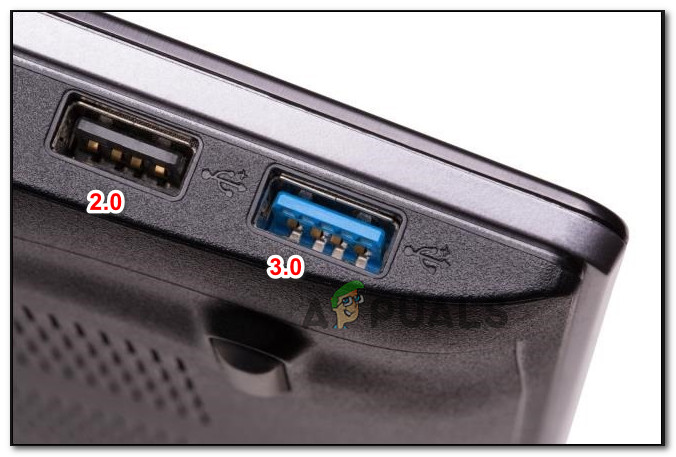
Method 4: Using a Different USB port
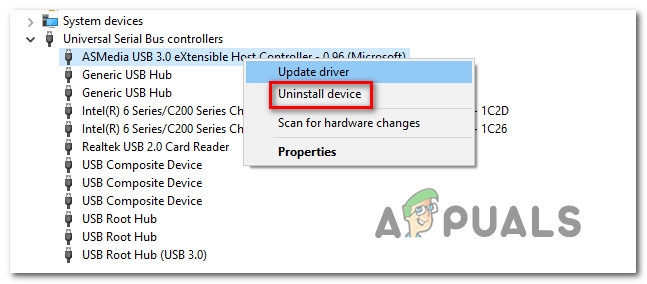
As it turns out, this particular issue can also occur due to a glitched USB port. Several affected users that also encountered this problem have reported that they managed to fix the issue by connecting the iPhone / iPad with a different USB port. If possible, use a USB 3.0 port since a lot of file transfer inconsistencies have been resolved. In case the same problem occurs with every port that you’re using, you should try reinstalling the Universal Serial Bus (USB) controller. Here’s a quick guide on how to do this on every recent Windows version: In case the same problem is still occurring, move down to the next potential fix below.
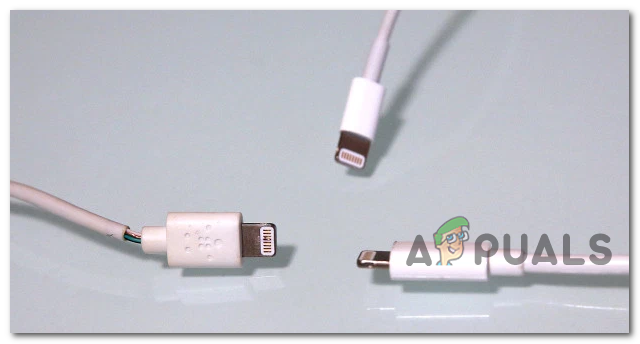
Method 5: Changing the Cable
According to some affected users, this problem can also be caused by a faulty micro-USB cable. If the cable is old, corroded or non-congruent, expect to experience various syncing issues including the apparition of the ‘iTunes could not connect to this iPhone / iPad because of an unknown error occurred (0xE8000065).’ error. If you see any evidence of a faulty cable, you’ll likely need to replace it in order to fix the issue. In case you’ve determined that the problem is not being caused by a bad cable, move down to the next potential fix below.
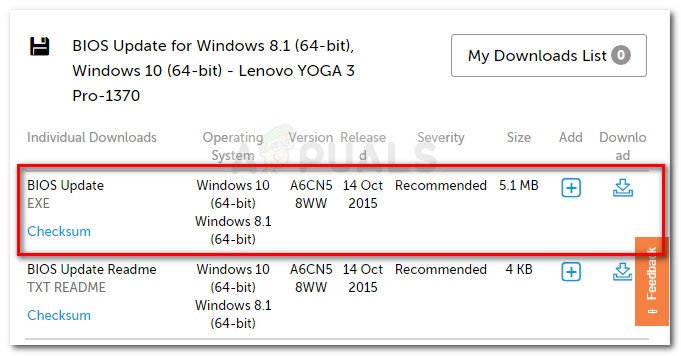
Method 6: Updating BIOS version
As unlikely as it may seem, the 0xe8000065 can also be caused by an unstable BIOS version that ends interfering with the USB controller. For some users, the fix consisted of updating their BIOS version to the latest. In most cases, this method proved to be effective for users with an Intel DP55WP motherboard. However, keep in mind that the procedure of updating your BIOS version will be different depending on your mainboard manufacturer. IMPORTANT: This operation should not be attempted if you haven’t done it before. Following the steps incorrectly might end up bricking the machine, so proceed at your own risk. Nowadays, every major manufacturer has developed it’s own BIOS flashing utility making the updating process way easier for the end-user. However, each motherboard manufacturer has their own steps regarding the updating of BIOS. Here is the official documentation for the major manufacturers that will show you how to update the BIOS:
DellASUSAcerLenovoSony Vayo
[FIX] iTunes Error 5105 on Windows (Your Request Cannot Be Processed)[FIX] iTunes Store Error Code 0x80092013 on WindowsHow to Fix iTunes Error Code 17 on Windows?How to Fix iTunes cannot connect error 0x80090302 on Windows 10?